Invisalign Attachments Explained: SmartForce Buttons, Types, and What to Expect (2026)
If your orthodontist has mentioned "attachments" or "buttons" as part of your Invisalign plan, you may be wondering what they look like, how they feel, and whether they defeat the purpose of choosing clear aligners. The short answer: Invisalign attachments are small, tooth-colored composite dots that act as precision handles for your aligners, and roughly 90% of comprehensive Invisalign cases use them. Far from a drawback, they are the engineering breakthrough that lets clear aligners tackle cases once reserved for metal braces.
Key Facts About Invisalign Attachments in 2026
- • Material: Tooth-colored dental composite resin (same material as white fillings)
- • Purpose: Provide grip points so aligners can execute rotations, extrusions, and root movements
- • Placement time: 20-30 minutes, completely painless, no anesthesia
- • Visibility: Color-matched to enamel; nearly invisible with aligners on
- • Duration: Worn throughout active treatment (6-18 months on average)
- • Removal: Buffed off at the end of treatment with no enamel damage
What Are Invisalign Attachments?
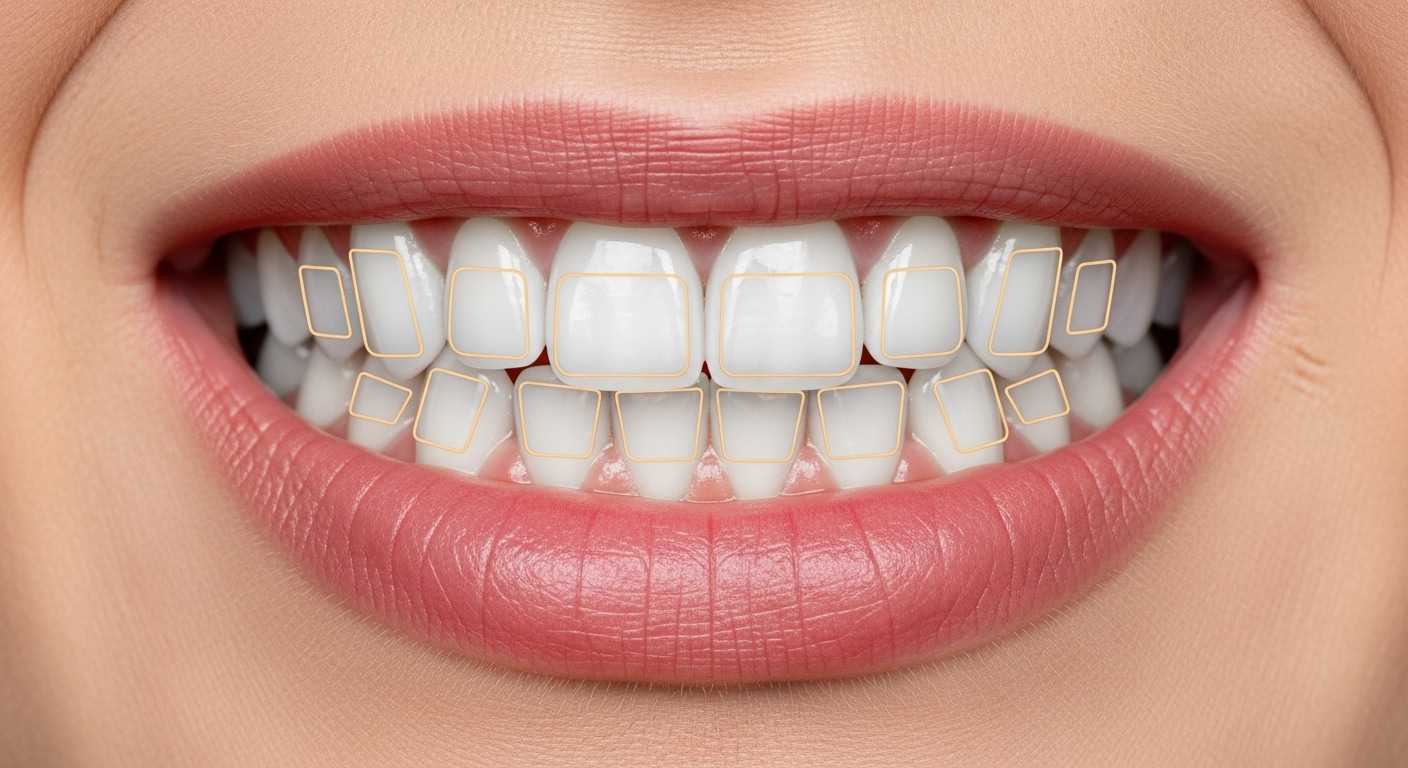
Invisalign attachments, formally called SmartForce attachments, are small bumps of dental composite resin bonded directly to the surface of specific teeth. Each attachment is precisely shaped -- rectangles, squares, triangles, ovals, or beveled forms -- and positioned at an exact angle calculated by Align Technology's ClinCheck software. The shape, size, and location of every attachment are unique to your treatment plan.
Think of attachments as tiny anchor points. A smooth, rounded tooth gives an aligner very little to grip; the plastic simply slides over the surface. An attachment creates a small ridge or ledge that the aligner can push against, applying targeted force in a direction that would otherwise be impossible. This is the core of Invisalign's patented SmartForce technology, and it is what allows clear aligners to achieve movements -- like bodily rotation of a canine or intrusion of an over-erupted molar -- that older-generation aligners could not reliably produce.
"SmartForce attachments transformed what clear aligners can do. Before we had predictable attachment protocols, we were limited to tipping movements. Now we can achieve root control, true rotation, and vertical corrections that rival fixed appliances."
Why Are Attachments Needed?
Without attachments, Invisalign aligners can only push teeth in simple directions -- mostly tipping the crowns. That works fine for mild spacing or minor rotations, but the majority of orthodontic cases require more sophisticated movements. Attachments unlock five categories of tooth movement that would otherwise be unreliable:
- Rotation: Turning a severely twisted premolar or canine into its correct orientation. Rotations greater than 10-15 degrees almost always require an attachment.
- Extrusion: Pulling a tooth downward (out of the gum line) when it has not fully erupted or has been worn down.
- Intrusion: Pushing a tooth upward (into the gum) to level the smile arc or correct a deep bite.
- Root torque: Tilting the root of a tooth without moving the crown, or vice versa. This is essential for stable, long-term results.
- Anchorage: Holding certain teeth firmly in place while adjacent teeth are moved, preventing unwanted chain-reaction shifting.
A 2023 study in the Angle Orthodontist found that attachments improved the predictability of canine rotation by approximately 30% compared to treatment without attachments. For patients, that translates to fewer refinement rounds and shorter overall treatment times.
Types of Attachment Shapes and Their Functions
Attachments are not one-size-fits-all. Align Technology's algorithms select from a library of shapes, each engineered for a specific biomechanical purpose. Your orthodontist can also place custom-designed attachments when the software's standard library does not cover an unusual movement.
| Shape | Primary Function | Common Teeth |
|---|---|---|
| Rectangular (vertical) | Root torque and tipping correction | Upper and lower incisors, canines |
| Rectangular (horizontal) | Extrusion and deep-bite correction | Central and lateral incisors |
| Square | Rotation correction | Premolars, molars |
| Triangular / wedge | Severe rotation, extrusion of rounded teeth | Canines, premolars |
| Ellipsoid / oval | General grip enhancement | Any tooth needing extra retention |
| Beveled | Intrusion (pushing tooth into gum) | Over-erupted molars, anterior teeth |
In many comprehensive cases, you will have a mix of shapes. It is common to see rectangular attachments on the front teeth for root control, square attachments on premolars for rotation, and beveled attachments on molars for bite correction -- all working simultaneously across the arch.
How Are Invisalign Attachments Placed?
Attachment placement is one of the simplest procedures in orthodontics. The entire appointment usually takes 20 to 30 minutes, and no anesthesia is required. Here is what happens step by step:
- Cleaning and drying: Your teeth are polished with a pumice paste, rinsed, and thoroughly dried. A clean, dry surface ensures the strongest possible bond.
- Etching: A mild acid gel is applied to the tooth surface for about 15 seconds, then rinsed off. This creates microscopic roughness so the composite adheres firmly.
- Template placement: A clear plastic template -- custom-manufactured by Align Technology with tiny wells in exactly the right positions -- is loaded with tooth-colored composite resin and seated over your teeth.
- Light curing: Your orthodontist shines a blue LED curing light on each attachment for a few seconds, hardening the composite in place.
- Template removal and cleanup: The template is peeled away, and any excess composite is trimmed and polished, leaving smooth, precisely shaped attachments.
Most patients describe the sensation as completely painless. You may notice a slightly gritty texture when the etching gel is applied, and mild pressure when the template is pressed onto your teeth, but there is no sharp pain or lasting discomfort.
NYC Tip: Timing Your Attachment Appointment
- • Attachments are typically placed at your second Invisalign visit, after your custom aligners have been manufactured (2-4 weeks after scanning).
- • You will leave the appointment wearing your first set of aligners with attachments already in place.
- • Schedule the appointment when you can go home afterward -- some patients prefer to adjust to the new feel of attachments in private before heading to work.
Who Needs Attachments -- and Who Can Skip Them?
Whether you need attachments depends entirely on the complexity of your orthodontic case. Here is a general breakdown:
| Case Type | Attachments? | Reason |
|---|---|---|
| Mild spacing (small gaps) | Usually not needed | Closing gaps requires simple tipping, which aligners do well alone |
| Minor crowding (1-3 mm) | Sometimes | Depends on whether teeth need rotation or just alignment |
| Moderate crowding (4-6 mm) | Yes, typically 6-12 attachments | Rotations, tipping corrections, and space management required |
| Bite correction (overbite, crossbite) | Yes, often 10+ attachments | Vertical and horizontal forces demand maximum grip |
| Severe rotation (>15 degrees) | Yes, essential | Triangular or square attachments provide the leverage needed |
Can you refuse attachments? Technically, yes. But declining them when your treatment plan calls for them may compromise your results, extend your timeline, or require switching to traditional braces later. If the idea of attachments concerns you, discuss specific alternatives with your orthodontist rather than simply opting out.
Are Invisalign Attachments Visible?
Visibility is the number-one concern patients raise about attachments, and understandably so -- the whole point of Invisalign is discretion. The reality is reassuring:
- With aligners in (22 hours per day): Attachments are hidden beneath the clear plastic. From conversational distance, they are virtually undetectable.
- With aligners out (eating and brushing): Attachments appear as small, subtle bumps on the tooth surface. Because they are color-matched to your enamel, most onlookers will not notice them unless they are looking closely.
- In photos: Attachments are rarely visible in photographs. Even in close-up selfies, they tend to blend with the natural texture of teeth.
Many NYC professionals -- attorneys, executives, television anchors -- wear attachments throughout treatment without colleagues ever noticing. If absolute invisibility matters to you, some orthodontists can position attachments on the less visible lingual (tongue-side) surface in select cases, though this approach is less common.
"I tell my patients that attachments are the trade-off for getting braces-level results without the braces. In over a decade of practice, I have never had a patient regret getting attachments once they see their final smile."
Comfort, Pain, and Adjustment Period
Attachments should not be a source of anxiety. Here is an honest timeline of what most patients experience:
- Day 1: You may feel a rough or gritty texture when you run your tongue over the attachments. This is normal and fades quickly.
- Days 1-3: Mild sensitivity or pressure as your teeth begin adjusting to the new forces. Over-the-counter ibuprofen or acetaminophen handles it easily.
- Days 4-7: The inside of your lips and cheeks adapts to the texture. Most patients stop noticing the attachments altogether.
- Week 2 and beyond: Attachments become part of your normal routine. Inserting and removing aligners gets faster with practice.
If any attachment feels particularly sharp or catches on your lip, your orthodontist can smooth it down in seconds at your next check-in. Orthodontic wax, available at any NYC pharmacy, can also provide temporary relief by covering a rough edge.
Warning: If an attachment causes a persistent sore or ulcer that does not heal within a week, contact your orthodontist. Prolonged irritation may mean the attachment needs reshaping or that the aligner fit should be evaluated.
How to Care for Teeth with Attachments
Attachments do not dramatically change your oral hygiene routine, but they do add a few extra considerations:
Brushing
Use a soft-bristle toothbrush and brush around each attachment carefully. Plaque loves to accumulate at the base of attachments, so angle your brush at 45 degrees and use small circular motions. An electric toothbrush with a round oscillating head is particularly effective at cleaning around the bumps.
Flossing
Attachments do not interfere with flossing. Continue to floss at least once daily. If you find traditional floss difficult, a water flosser (such as a Waterpik) can be a convenient supplement -- it blasts food debris from around attachments effortlessly.
Preventing Stains
The composite resin itself is highly resistant to staining, but the bonding agent at the edges can discolor over time if exposed to heavy staining agents. To keep your attachments looking their best:
- Rinse with water or brush after consuming coffee, tea, red wine, or curry
- Avoid smoking or using tobacco products
- Put your aligners back in promptly after eating -- they protect the attachments from pigment exposure
- Use a whitening toothpaste to minimize surface buildup
What If an Attachment Falls Off?
Attachment debonding is uncommon but not unheard of. It usually happens when biting into something hard (an apple, a crusty bread roll) or if the bonding surface was slightly contaminated during placement. If one comes loose:
- Do not panic. It is not an emergency and does not mean your treatment is ruined.
- Continue wearing your current aligner. The aligner still provides general force to your teeth even without the attachment.
- Call your orthodontist within 1-2 business days. They will rebond the attachment at a quick visit, usually in under 10 minutes.
- Do not try to reattach it yourself. Over-the-counter adhesives will not work and could damage your tooth.
To reduce the risk of debonding, avoid biting directly into very hard or crunchy foods, do not use your front teeth as tools (opening packages, tearing tape), and remove aligners gently by starting from the back molars and working forward.
Warning: Do not ignore a missing attachment for weeks. Even a single missing attachment can cause the corresponding tooth to fall behind the planned movement sequence, potentially requiring additional refinement trays and extending your treatment by months.
Attachments vs. Buttons vs. Elastic Hooks: What Is the Difference?
Patients sometimes confuse attachments with other small devices used in Invisalign treatment. Here is how they differ:
| Device | Material | Purpose | Visibility |
|---|---|---|---|
| SmartForce attachments | Tooth-colored composite | Give aligners grip for complex movements | Nearly invisible |
| Buttons (bonded) | Metal or composite | Anchor point for rubber bands (elastics) | Small but may be visible if metal |
| Precision cuts (built into aligner) | Aligner plastic | Hook point for elastics, no bonding needed | Invisible (part of aligner) |
| Rubber bands (elastics) | Latex or latex-free rubber | Correct bite by connecting upper and lower arches | Visible when mouth is open |
Some patients need attachments only, some need attachments plus elastics, and some complex bite cases need all three. Your orthodontist will explain exactly which devices your treatment requires and why.
How Are Attachments Removed?
Attachment removal is one of the most satisfying appointments in your entire Invisalign journey. It happens at the end of active treatment, just before you receive your retainers. Here is what to expect:
- Your orthodontist uses a slow-speed handpiece (similar to a polishing tool) to gently buff the composite off each tooth.
- Each tooth is then polished with a fine abrasive paste to restore its natural smoothness.
- A visual and tactile check ensures no composite residue remains.
The entire removal process takes about 15 to 20 minutes, is completely painless, and does not damage your enamel. Multiple studies, including a 2022 analysis in the Journal of Clinical Orthodontics, have confirmed that the enamel surface after attachment removal shows no clinically significant loss compared to pre-treatment measurements.
Do Attachments Add to Invisalign Cost?
In almost every practice, attachments are included in the overall Invisalign treatment fee. You should not see a separate line item for attachment placement or removal. In NYC, comprehensive Invisalign treatment (which typically includes attachments) ranges from $5,000 to $8,000, compared to a national average of $4,000 to $7,000. If an attachment falls off and needs rebonding, that visit is also generally covered under your treatment plan.
Always ask your orthodontist upfront for a complete cost breakdown so there are no surprises. Most NYC practices offer payment plans, accept insurance with orthodontic benefits, and allow you to pay with HSA or FSA pre-tax dollars, effectively reducing your out-of-pocket cost by 20-30%.
What Is Usually Included in Your Treatment Fee
- • All attachment placements and removals
- • Rebonding if an attachment falls off during treatment
- • All aligner sets, including refinement trays
- • Progress-check appointments every 6-10 weeks
- • 3D iTero scans and ClinCheck treatment simulation
SmartForce Features in 2026: What Has Changed
Align Technology continually updates its attachment protocols. Here are the most notable advances relevant to patients starting treatment in 2026:
- SmartForce Aligner Activation: Newer aligners have built-in pressure ridges that work in concert with attachments, distributing force more evenly and reducing the "tight" feeling when switching trays.
- Optimized multi-tooth attachments: ClinCheck now recommends coordinated attachment patterns across adjacent teeth, improving the predictability of arch-wide movements like expansion.
- SmartStage technology: Staging algorithms now move teeth in smaller, more frequent increments -- meaning less discomfort per tray change and fewer cases of teeth "not tracking."
- Improved composite materials: The latest bonding composites used by many NYC orthodontists are more stain-resistant and offer higher bond strength, reducing the rate of debonding incidents.
These incremental improvements mean that 2026-era Invisalign treatment with attachments is more comfortable, more predictable, and faster than it was even two or three years ago. If you researched attachments before and were put off, it may be worth revisiting the experience with a current provider.
Frequently Asked Questions
Not all, but most do. Approximately 90% of Invisalign Comprehensive cases use at least some attachments. Simple cases involving minor spacing may skip them, but moderate-to-complex cases almost always benefit from SmartForce attachments to achieve precise, predictable tooth movements.
Attachments are designed to be virtually invisible. They are color-matched to your enamel and covered by your clear aligners most of the day. When aligners are removed for eating, they may appear as small, subtle bumps, but most people will not notice them in normal conversation.
No. The placement procedure is entirely painless and requires no anesthesia. Your orthodontist cleans your teeth, places a template, fills it with composite resin, and cures it with a UV light. The whole process takes about 20 to 30 minutes. Some patients feel mild pressure for a day or two afterward as teeth adjust.
Attachments remain bonded to your teeth for the duration of your active treatment, which is typically 6 to 18 months for most cases. They are removed by your orthodontist at the end of treatment, before you transition to retainers. The removal process is quick, painless, and does not damage enamel.
Continue wearing your current aligner and contact your orthodontist within a day or two. They will schedule a brief appointment to rebond the attachment. A missing attachment can cause teeth to track improperly, so prompt replacement helps keep your treatment on schedule.
Sources
1. Align Technology — SmartForce Attachments Technical Overview, 2025
2. Angle Orthodontist — "Effectiveness of Optimized Attachments for Canine Rotation with Clear Aligners," 2023
3. Journal of Clinical Orthodontics — "Enamel Surface After Composite Attachment Removal: A Systematic Review," 2022
4. American Association of Orthodontists (AAO) — Clear Aligner Therapy Guidelines, 2024
5. American Journal of Orthodontics and Dentofacial Orthopedics — "Attachment Design and Tooth Movement Predictability," 2023
6. Journal of Dental Research — "Bond Strength of Orthodontic Attachments to Enamel: A Comparative Study," 2021
7. European Journal of Orthodontics — "Patient-Reported Comfort Outcomes with SmartForce Attachments," 2024
Have Questions About Invisalign Attachments?
A certified orthodontist in your NYC neighborhood can show you exactly how attachments will work for your specific case -- including a 3D preview of your treatment plan.
Find a Provider in NYC