Invisalign With Elastics (Rubber Bands): Why, How, and What to Expect (2026)
If your orthodontist has told you that your Invisalign treatment will include rubber bands -- technically called elastics -- you are not alone. Approximately 30-40% of Invisalign patients require elastics at some point during treatment, especially those with bite discrepancies that aligners alone cannot fully correct. This guide explains exactly why elastics are used, how to wear them properly, what to expect in terms of discomfort, and how they affect your overall treatment timeline.
Key Facts About Invisalign Elastics
- • About 30-40% of Invisalign patients need elastics during treatment
- • Elastics correct bite issues (overbite, underbite, crossbite, open bite)
- • Wear time: 20-22 hours/day for most prescriptions
- • Typical duration: 4-8 months during treatment
- • Small precision-cut hooks on aligners or buttons on teeth anchor the bands
- • Compliance is the single biggest factor in elastic effectiveness
Why Elastics Are Needed With Invisalign
Invisalign aligners are remarkably effective at moving individual teeth within a single arch -- rotating, tilting, and translating teeth into better positions. However, aligners sit on only one arch at a time (upper or lower), which means they have limited ability to change how the upper and lower jaws relate to each other. This is where elastics come in.
Rubber bands stretch between the upper and lower aligners (or between the aligner and a button bonded to a tooth), creating inter-arch forces that guide the jaw into proper alignment. Think of the aligners as handling the fine positioning of individual teeth, while the elastics handle the big-picture relationship between your upper and lower jaws.
The most common bite issues that require elastics include:
- Class II overbite: The upper jaw sits too far forward relative to the lower jaw. Elastics pull the lower jaw forward and/or the upper jaw back.
- Class III underbite: The lower jaw protrudes beyond the upper jaw. Elastics work to retract the lower arch and advance the upper.
- Crossbite: One or more upper teeth bite inside the lower teeth. Cross-elastics help shift teeth laterally.
- Open bite: Front teeth do not meet when the back teeth are closed. Vertical elastics help close the gap.
- Midline discrepancy: The center lines of the upper and lower arches do not match. Diagonal elastics shift one arch relative to the other.
Types of Elastic Configurations
Your orthodontist will prescribe a specific elastic configuration based on your bite diagnosis. Understanding the different types helps you grasp why the bands need to be placed exactly where they are instructed.
| Configuration | Bite Problem | Placement | Force Direction |
|---|---|---|---|
| Class II | Overbite / overjet | Upper canine to lower molar | Pulls lower jaw forward |
| Class III | Underbite | Lower canine to upper molar | Pulls upper jaw forward / lower back |
| Cross-bite | Lateral crossbite | Upper buccal to lower lingual (or reverse) | Lateral correction |
| Vertical (box) | Open bite | Box pattern on front teeth, upper and lower | Pulls teeth together vertically |
| Triangle | Open bite / settling | Triangle pattern across 3 teeth | Vertical extrusion and settling |
| Midline | Midline shift | Diagonal across front teeth | Shifts one arch laterally |
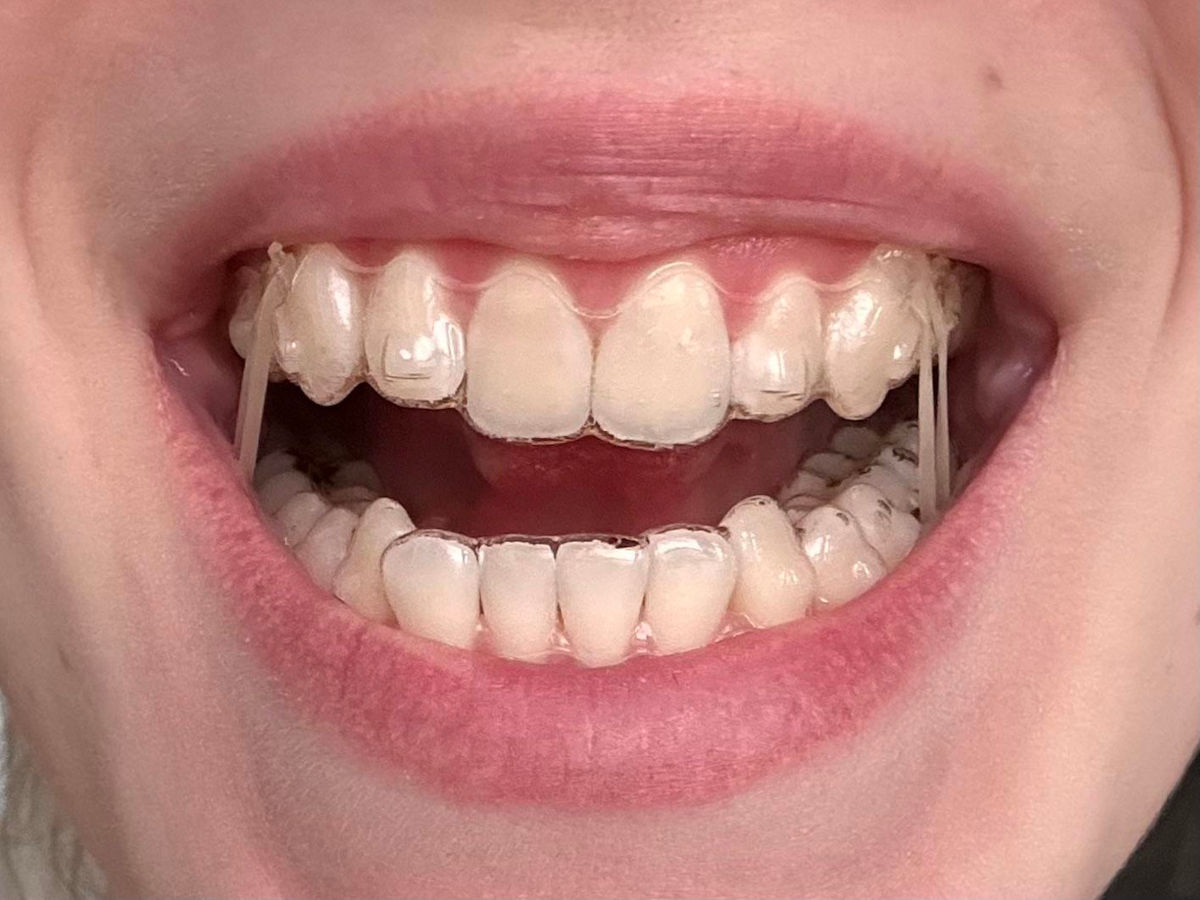
How Elastics Attach to Invisalign Aligners
Unlike traditional braces where rubber bands hook onto metal brackets, Invisalign uses two main attachment methods for elastics:
Precision Cuts (Built Into the Aligner)
Invisalign aligners can be manufactured with small, precisely positioned cuts or hooks molded into the aligner plastic. These precision cuts are designed into your ClinCheck treatment plan from the start, so they appear on exactly the right aligners at exactly the right stage of treatment. You simply hook the elastic onto the cut in the aligner.
Buttons or Hooks Bonded to Teeth
In some cases, your orthodontist will bond small composite buttons or metal hooks directly to certain teeth. The elastic then stretches from the button on the tooth to a precision cut on the opposing aligner, or between two buttons. This method is used when more precise force control is needed or when the aligner precision cut alone does not provide an ideal hook point.
"Precision-cut elastics were a game-changer for Invisalign. Before this technology, correcting Class II and Class III bites with clear aligners was extremely challenging. Now we achieve results that rival what we see with traditional braces and elastics."
How to Wear Your Elastics Properly
Correct elastic wear is essential for treatment success. Here is a step-by-step guide:
- Identify the hook points: Your orthodontist will show you exactly where each elastic goes. Take a photo or draw a diagram for reference at home.
- Hook the elastic on one end first: Start with the easier hook point (usually the upper) and stretch the band to the lower attachment.
- Check the configuration: Make sure the elastic follows the prescribed path. A Class II elastic on the wrong teeth will not produce the desired result.
- Replace elastics frequently: Rubber bands lose their elasticity after 8-12 hours. Replace them at least 2-3 times daily, or whenever they feel loose or snap.
- Remove when eating: Take out elastics (and aligners) when you eat or drink anything other than water.
- Replace after eating: Put fresh elastics back immediately after eating and brushing. Do not "take a break" from elastics while your aligners are out.
- Keep extras on hand: Carry a bag of replacement elastics with you everywhere. Your orthodontist will provide plenty.
Warning: Never double up on elastics to "speed up" treatment unless your orthodontist specifically instructs you to do so. Using heavier or additional elastics can apply excessive force, damaging roots, causing pain, and potentially moving teeth in the wrong direction.
Pain and Adjustment Period
Most patients experience some discomfort when first starting elastics, similar to the soreness felt with a new set of aligners. Here is what to expect and how to manage it:
- Days 1-3: Moderate jaw aching, especially when opening and closing the mouth. Soreness around the teeth where elastics attach.
- Days 4-7: Discomfort reduces noticeably. Jaw begins to adapt to the elastic forces.
- Week 2+: Most patients report minimal to no discomfort. Placing and removing elastics becomes second nature.
For pain management strategies, see our guide on Invisalign pain and discomfort. Key tips include taking ibuprofen (200-400 mg) before bed during the first few days, using orthodontic wax on any buttons that irritate cheeks, and eating soft foods while your jaw adjusts.
| Concern | Expected | Call Your Orthodontist |
|---|---|---|
| Jaw soreness | Mild aching for 3-5 days | Severe pain lasting over 1 week |
| Tooth sensitivity | Mild pressure when biting | Sharp, shooting pain |
| Cheek irritation | Minor rubbing near buttons | Open sores or persistent bleeding |
| Elastic breakage | Occasional snapping (replace immediately) | Elastics breaking within minutes repeatedly |
| Jaw clicking | Mild clicking that resolves in days | Painful clicking, locking, or inability to open mouth |
Why Compliance Matters So Much
Elastic compliance is arguably the single most important patient-controlled factor in Invisalign treatment success for bite correction cases. Research shows that inconsistent elastic wear is the leading cause of treatment plan revisions, extended timelines, and suboptimal bite outcomes.
Here is why: the forces generated by elastics need to be applied continuously to produce biological tooth movement. When you skip wearing elastics for even a few hours, teeth begin to drift back toward their original positions. When you resume, the forces must first overcome this regression before any forward progress occurs. This "two steps forward, one step back" pattern dramatically slows treatment.
"I can always tell when a patient has not been wearing their elastics. The tracking goes off, the bite is not improving, and we end up needing refinement aligners. Full compliance with elastics is non-negotiable if you want your treatment to finish on time and with the best possible bite."
Tips for Elastic Compliance
- • Set phone reminders to replace elastics after every meal
- • Keep bags of elastics in multiple locations: work desk, car, bag, bathroom
- • Use a habit-tracking app to monitor daily wear consistency
- • Replace elastics 3-4 times per day with fresh ones for maximum force
- • Practice putting them on quickly -- most patients master it within a week
Impact on Treatment Timeline
Adding elastics to your Invisalign treatment may or may not extend your overall timeline. In many cases, elastics are incorporated into the original treatment plan from the beginning, so the projected completion date already accounts for elastic wear. However, if your orthodontist adds elastics mid-treatment due to insufficient bite improvement, this could extend your treatment by 2-6 months.
Good compliance typically keeps treatment on track. For reference, a standard Invisalign treatment timeline runs 12-18 months for moderate cases. Patients with bite corrections requiring elastics may fall toward the longer end of that range, particularly for Class II or Class III corrections.
Elastics With Invisalign vs Elastics With Braces
If you have worn braces before (or know someone who has), you may be familiar with rubber bands used in traditional orthodontic treatment. The concept is identical -- applying inter-arch forces to correct the bite -- but there are some practical differences.
With braces, elastics hook onto metal brackets that are permanently bonded to teeth. With Invisalign, they hook onto precision cuts in the aligner or composite buttons on the teeth. Both methods work, but Invisalign patients report finding it slightly easier to hook elastics onto precision cuts than onto small metal brackets. The trade-off is that when you remove your aligners to eat, the elastics come out too -- while braces patients can sometimes leave elastics in place during meals.
Common Problems and Troubleshooting
Elastics Keep Breaking
If elastics snap frequently, the most likely causes are: using the wrong size (too small), opening the mouth too wide during yawning or talking, or old elastics that have lost their integrity. Contact your orthodontist for the correct size and replace elastics every 8-12 hours even if they have not broken.
Difficulty Hooking Elastics
In the first few days, attaching elastics can feel awkward. Use a mirror, good lighting, and both hands. Some patients find it helpful to use an elastic placer tool (available at most pharmacies). With practice, most patients can hook elastics in under 10 seconds without a mirror.
Aligner Not Seating Properly With Elastics
If elastics seem to pull the aligner away from the teeth or prevent full seating, contact your orthodontist. This could indicate a tracking issue that needs attention. For related tray-fit concerns, see our guide on Invisalign tray not fitting.
Warning: If a bonded button or hook falls off your tooth, save it and call your orthodontist promptly. Do not continue wearing elastics with a missing anchor point, as this could redirect forces incorrectly and move teeth in unintended directions.
NYC Patient Tips
For Invisalign patients in Manhattan, Brooklyn, Queens, and the surrounding boroughs, here are some NYC-specific tips for managing life with elastics:
- Commute prep: Keep a ziplock bag with extra elastics, a compact mirror, and floss in your work bag. Subway delays are a great time to check your elastics.
- Restaurant dining: Remove elastics and aligners together before eating. Store in your aligner case -- never wrap in a napkin (the number one cause of lost aligners in NYC restaurants).
- Office visits: Most NYC orthodontists can schedule elastic checks during regular monitoring appointments every 6-10 weeks. If you need an emergency visit for a broken button, look for offices in your borough that offer same-day appointments.
- Insurance: Elastics are included in your overall Invisalign treatment fee, which is covered by most PPO orthodontic benefits. There is no separate charge for elastics. For insurance details, see our Invisalign cost and insurance page.
Frequently Asked Questions
Rubber bands (elastics) provide additional force that aligners alone cannot generate. They are primarily used to correct bite problems such as overbites, underbites, crossbites, and open bites by shifting the upper and lower jaws into proper alignment. Without elastics, certain bite corrections would be impossible with clear aligners.
Most orthodontists prescribe elastics for 20-22 hours per day -- the same wear schedule as the aligners themselves. You remove them only when eating and brushing. Some patients are prescribed nighttime-only elastics, but full-time wear is more common for effective bite correction.
You may experience mild soreness or jaw aching for the first 3-5 days of elastic wear, similar to the discomfort when starting a new aligner tray. Over-the-counter pain relievers like ibuprofen can help. Most patients report that the discomfort subsides significantly after the first week as the jaw adapts to the new forces.
Skipping elastics is one of the most common reasons Invisalign treatment stalls or fails to correct bite issues. Without consistent elastic wear, the bite correction programmed into your treatment plan will not occur, potentially requiring treatment extensions, plan revisions, or even switching to traditional braces. Compliance is critical.
The duration varies by case. Some patients wear elastics for only 3-4 months during a specific phase of treatment, while others need them for 6-12 months or longer. Your orthodontist will specify the timeline based on the severity of your bite correction. On average, NYC patients wear elastics for about 4-8 months of their total treatment.
Sources
1. Align Technology. Invisalign Precision Cuts and Elastic Protocols: Clinical Guide, 2025.
2. American Journal of Orthodontics and Dentofacial Orthopedics. "Efficacy of Class II Correction With Clear Aligners and Elastics." Vol. 167, Issue 3, 2025.
3. Angle Orthodontist. "Patient Compliance With Elastic Wear in Clear Aligner Therapy: A Prospective Study." Vol. 95, Issue 2, 2025.
4. Journal of Clinical Orthodontics. "Biomechanics of Inter-Arch Elastics in Aligner Treatment." Vol. 59, Issue 6, 2024.
5. European Journal of Orthodontics. "Comparison of Bite Correction Outcomes: Aligners With Elastics vs Fixed Appliances." Vol. 47, Issue 4, 2025.
6. American Association of Orthodontists (AAO). Clinical Practice Guidelines for Elastic Prescriptions, 2024.
7. Seminars in Orthodontics. "Managing Complex Malocclusions With Clear Aligners: The Role of Auxiliaries." Vol. 31, Issue 1, 2025.
Need Help With Your Invisalign Elastics?
An experienced NYC orthodontist can evaluate your bite, prescribe the right elastic configuration, and monitor your progress to ensure optimal results.
Find a Provider in NYC